

Install Burglar Alarm
You're standing in the hallway with a floorplan in one hand and a box of alarm equipment in the other. The obvious temptation is to unpack the motion sensors first. In practice, the better starting point is the control panel, because its position determines cable routes, zone supervision, backup power access and how easily the system can be serviced later.
That decision matters in Perth. WA Police reported 12,693 burglaries in 2024, compared with 17,017 in FY2024 and 37,505 in 2015, yet WA recorded 4,472 burglaries per 100,000 households and 3,442 attempted break-ins per 100,000 households, both above the national average (PerthNow's report on WA burglary figures). An alarm still has a place, but a good installation starts with the property's actual weak points, not a generic detector checklist.
Surveying Your Perth Property Before Anything Goes on the Wall
Start with a pencil, floorplan and torch. Mark the proposed panel location before you open a detector package, then walk through the property as though you're approaching it from outside.
Map the likely entry paths
Begin at the boundary. Mark the side gate, carport, garage access, front door, rear laundry door and any path that leads directly to a concealed part of the house. Perth homes often have practical access routes through side passages and rear yards, so a front-door-only plan can leave the most likely approach unprotected.
Inside, record every external door and ground-floor window. Give special attention to sliding doors, windows beside handles, glazed panels near door locks and garage-to-house doors. A large window doesn't automatically need its own glass-break detector, but it does need a deliberate decision about whether you'll protect it with a reed switch, motion coverage or another suitable device.
Wall construction changes the installation method. Double brick, brick veneer, Colorbond, timber and plaster-lined walls each affect drilling, fixing and cable routing. Check the roof space and underfloor access before promising concealed wiring. Also identify the nearest suitable mains location, the NBN or existing communications entry point, and areas where foil insulation, reinforced walls or distance may weaken wireless signals.
Produce a usable installation plan
A proper survey should leave you with more than a rough device count. Record:
- Panel position: Confirm access to power, communications equipment and a serviceable protected area.
- Siren location: Choose a visible external position that can be reached safely for maintenance.
- Zone plan: Assign doors, windows and motion detectors to sensible zones rather than grouping unrelated areas together.
- Cable sketch: Mark roof-space routes, wall drops, detector points and service loops.
- Wireless test points: Note locations that need signal testing before a wireless device is fixed permanently.
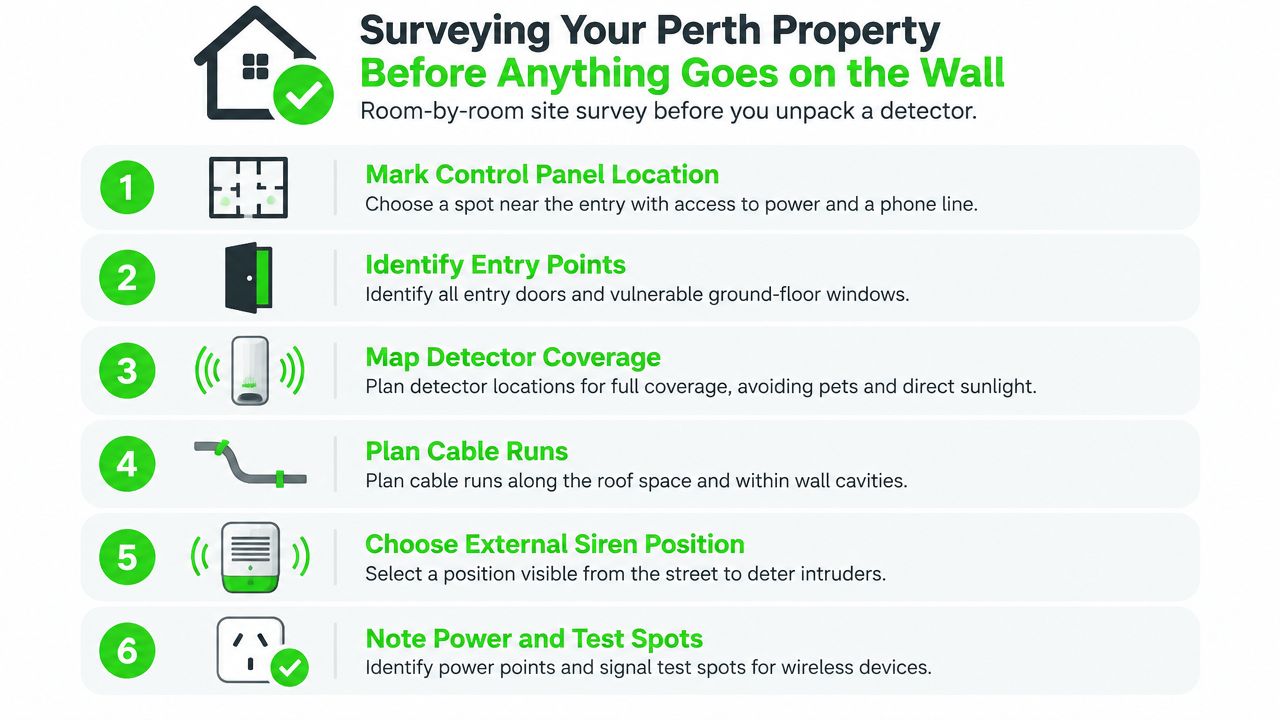
Practical rule: If the panel location is an afterthought, the rest of the alarm installation usually becomes a compromise.
The survey also helps separate detection from convenience. A hallway PIR may cover several rooms, but it can be a poor choice where pets move through the area, sunlight reaches the lens or air-conditioning causes temperature changes. Mark the coverage you need, then select devices to suit it.
Choosing Between Wired, Wireless and Hybrid Alarm Setups
The right architecture depends less on fashion than on the building you're working with. A new build with open roof and wall access is a different proposition from a finished double-brick home where every concealed cable route means disruption, patching and repainting.
Wired alarms remain attractive for permanent properties. Door contacts, PIRs and other devices communicate over a physical cable backbone, so there's no sensor battery schedule and fewer radio-signal variables. The trade-off is installation access. In an occupied Perth home, chasing double-brick or rendered walls can be invasive, while visible conduit may be unacceptable in living areas.
Wireless systems suit retrofits, rentals and buildings where neat installation matters more than avoiding battery management. Devices can often be positioned with minimal wall disturbance, and relocation is simpler. They still need proper signal testing, battery planning and a clear process for identifying low-battery or communication faults. A sensor that works beside the panel may not communicate reliably at the end of a house or behind difficult construction.
A hybrid system often gives the most practical balance. The panel and strategically important detectors can be hardwired, while difficult-to-reach windows, sheds or internal additions use wireless devices. This approach preserves a physical backbone without forcing every peripheral onto a costly cable route. For a detailed look at retrofit-friendly options, compare the wireless alarm systems available for Perth properties.
| Factor | Wired | Wireless | Hybrid |
|---|---|---|---|
| Reliability | Strong physical communication path and no sensor battery dependency | Depends on signal quality and battery condition | Uses wired reliability where it matters and wireless flexibility elsewhere |
| Installation impact | Requires cable routes, drilling and access to roof or wall cavities | Faster retrofit with less disruption | Moderate disruption, targeted at the panel and priority devices |
| Appearance | Very neat when cables are concealed, but conduit may be visible in difficult areas | Minimal visible cabling | Neat core installation with limited wireless additions |
| Rental suitability | Often restricted by landlord or building conditions | Usually easier to remove or relocate | Depends on which devices are hardwired |
| Expansion | Straightforward when spare zones and cable capacity are planned | Convenient, provided signal and battery capacity remain suitable | Flexible, but the panel must support both device types |
For most finished owner-occupied homes, choose wired where access is easy, wireless where the building makes cabling unreasonable, and hybrid when you want both serviceability and a clean finish. Don't let the device choice hide the larger question: can the selected panel support the zones, supervision, communications and future additions the property may need?
Walking Through the Actual Install From Panel to Siren
A competent technician doesn't begin by sticking PIRs onto walls. The panel is the system's spine, so the installation sequence should protect that foundation first.
Fix the panel and establish the backbone
The agreed control-panel location should have a dependable power path, room for the enclosure and reasonable access for servicing. A qualified electrician or appropriately authorised installer must handle the mains work. The alarm supply should be arranged through a suitable isolating switch, with the backup battery and communications equipment kept accessible but not exposed at the main entry point.
Next, run the alarm cable backbone through the roof space, wall cavities or underfloor area. Route it past the planned detector positions, leave service loops at terminations and keep the cable protected from sharp edges, heat sources and later building work. Separating alarm cabling from other services helps reduce damage and makes fault-finding less frustrating.
Add devices after the routes make sense
Mount PIRs only after coverage, height and likely obstructions have been checked. Fit reed switches so doors and windows can close properly without placing strain on the contact. The external siren and strobe should be visible and difficult to interfere with, while the internal screamer should be positioned to be heard throughout the occupied area.
The keypad belongs where users naturally arm and disarm the system, usually close to the main entry route. That position must also work with entry and exit delays. A keypad hidden in a remote room may look tidy on a plan but becomes a daily nuisance.
Program, test and document
Programming isn't just entering a user code. Zones need useful names, entry and exit behaviour must match how the household operates, and alarm events should report correctly through the chosen communications path. The installer should then:
- Run a walk-test: Activate every PIR and confirm the correct zone appears.
- Open each protected opening: Check every reed switch, contact and tamper circuit.
- Test audible devices: Confirm the internal sounder, external siren and strobe operate as intended.
- Check power failure behaviour: Verify backup operation and fault reporting.
- Confirm communications: Test app notifications or monitoring signals where fitted.
- Complete handover: Provide user codes, a zone list, operating instructions and service information.
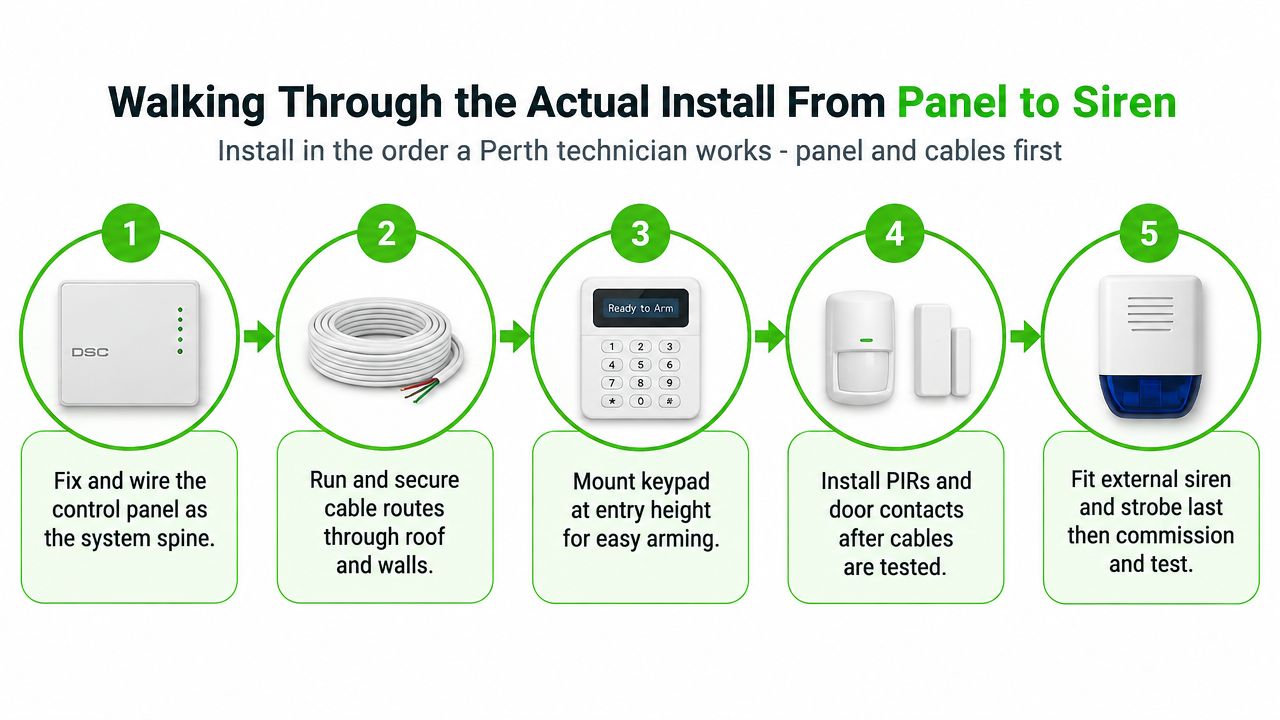
The panel-first sequence is central to a professional alarm system installation in Perth, especially when later integration with CCTV or access control is likely.
A system isn't commissioned because the keypad lights up. It's commissioned when every zone, tamper, siren, notification path and user function has been tested under realistic conditions.
Integrating the Alarm With CCTV, Intercom and Access Control
A standalone alarm can detect an opening or movement, but an integrated system gives the event useful context. The alarm can tell the recorder to capture a protected area, direct a camera to a preset, or send an event to software that combines video and access information.
Plan those interfaces before closing walls. A common arrangement uses a hard-wired alarm input on the NVR or DVR, a relay-to-IP converter for software events, and alarm outputs that trigger a camera preset tour. An intercom may provide two-way audio at the door, while an access-control board can accept an arm-state output and apply a defined locking action.
| Integration | Trigger type | Cable to run now | Common pitfall |
|---|---|---|---|
| Alarm to NVR or DVR | Dry contact or supervised alarm input | Suitable alarm pair between panel and recorder location | Recorder input is programmed for the wrong polarity |
| Alarm to camera software | Relay-to-IP event | Alarm pair plus network path planned separately | Cheap IP relay introduces latency into video verification |
| Alarm PIR to camera preset | Relay or software event | Alarm cable to the integration point | Camera moves to a preset that doesn't cover the actual zone |
| Intercom and video doorbell | IP event, relay or audio interface | Cat6 and a suitable alarm or control pair | Arm-state and door events aren't mapped consistently |
| Access control | Arm output, relay or IP event | Spare shielded pair to future reader or controller | Wireless bridge misses the armed or disarmed state |
At the Perth panel location, run Cat6 towards the NVR cupboard while keeping power, alarm wiring and data pathways organised and appropriately separated. A spare shielded pair can preserve options for a future reader, gate controller or intercom without reopening finished walls.
Dry contacts, voltage triggers and IP events aren't interchangeable. A dry contact changes state like a switch, a voltage trigger relies on the receiving device's expected electrical signal, and an IP event depends on network availability, software compatibility and timing. Double-polarity tampering and missed arm-state signals on wireless bridges are common commissioning failures, so test both the normal event and the fault condition.
For security businesses handling frequent enquiries, operational tools such as automated call answering for locksmiths can also help separate urgent customer calls from routine administration. The security architecture itself should remain the priority, with clear event paths and documented responsibilities. Properties needing a coordinated alarm, camera, intercom and access-control design can review integrated security systems for Perth sites.
Getting WA Compliance, Licensing and Insurance Right
A panel installed beside the front door can leave a system exposed before anyone tests a detector. Compliance starts with the design, especially panel placement, zone supervision and the records produced during commissioning.
Australian intruder-alarm work is benchmarked against AS/NZS 2201.1, covering design, installation, commissioning and maintenance for private, commercial and special installations (Standards Australia's AS/NZS 2201.1 listing). In a WA study of 295 installed systems, 17.52% had control panels outside the alarmed area, 14.86% had panels at an entry or exit point, 45.90% could not support dual end-of-line supervision and 58.75% used single end-of-line supervision (the Australian Institute of Criminology research reference).
Those findings should shape the quote, not just the final inspection. The panel will generally belong inside the protected area, away from the obvious entry route. Ask how the proposed wiring detects open circuits, shorts and tampering, and whether the selected equipment supports the required supervision method.
The study also notes that Australian installer licensing assessment is tied to AS2201.1-based knowledge (AIC, tandi489). Confirm who holds the relevant WA security licence, who completes electrical work and who carries responsibility for monitoring conditions or permits. Kit ownership does not remove those obligations.
Translate technical compliance into paperwork
Before installation, ask which system standard, device configuration and monitoring arrangement apply. If your insurer or monitoring provider expects particular records, confirm the requirement before the walls are closed.
Request:
- A compliance record: Confirmation of installation and commissioning checks.
- A zone list: Plain-English names for every protected area.
- An as-built diagram: Panel, detector, siren and communications locations.
- A service logbook: Space for future inspections, faults and repairs.
- Monitoring conditions: Response procedures, permits and required signage.
A neat cable run is useful. The commissioning record shows whether the completed system matches the agreed design, and gives an insurer or future technician something concrete to review.
Costs, Timelines and Why Servicing Matters More Than the Sticker Price
A cheap panel can produce an expensive alarm system. Poor detector positions, no access for servicing, missing integration cabling or an overlooked supervision fault can create costs long after installation.
The available WA evidence supports a measured view of risk. Nationally, the Australian Institute of Criminology estimated that 3.5% of Australian households experienced a break-in or attempted break-in in 2020–21, while 68% of break-in victims reported the crime to police and 20% reported personal items such as jewellery and clothing stolen. WA's later burglary figures (PerthNow) show that lower volumes do not remove the need for property-specific early warning and hardening.
Compare ownership, not just installation
A useful quote names the panel, detector types, communications method, siren, backup power, programming, commissioning and future service terms. Wired, wireless and hybrid systems can all work, but their labour, access and maintenance requirements differ.
Perth pricing changes with the building structure, device count, cable access, monitoring, integrations and existing infrastructure. Ask each installer to price an identical scope, then separate optional additions from the protection the property needs. Unverified price ranges rarely provide a sound comparison.
Use this calculation:
Five-year cost = installation + monitoring charges + scheduled servicing + batteries and consumables + repairs or upgrades.
A service visit should cover functional testing, tamper checks, battery assessment, communications verification and inspection of devices exposed to dust, heat, weather or coastal conditions. Wireless sensors require a planned battery process. Every system also needs a defined response to nuisance alarms, rather than repeated silencing without finding the cause.
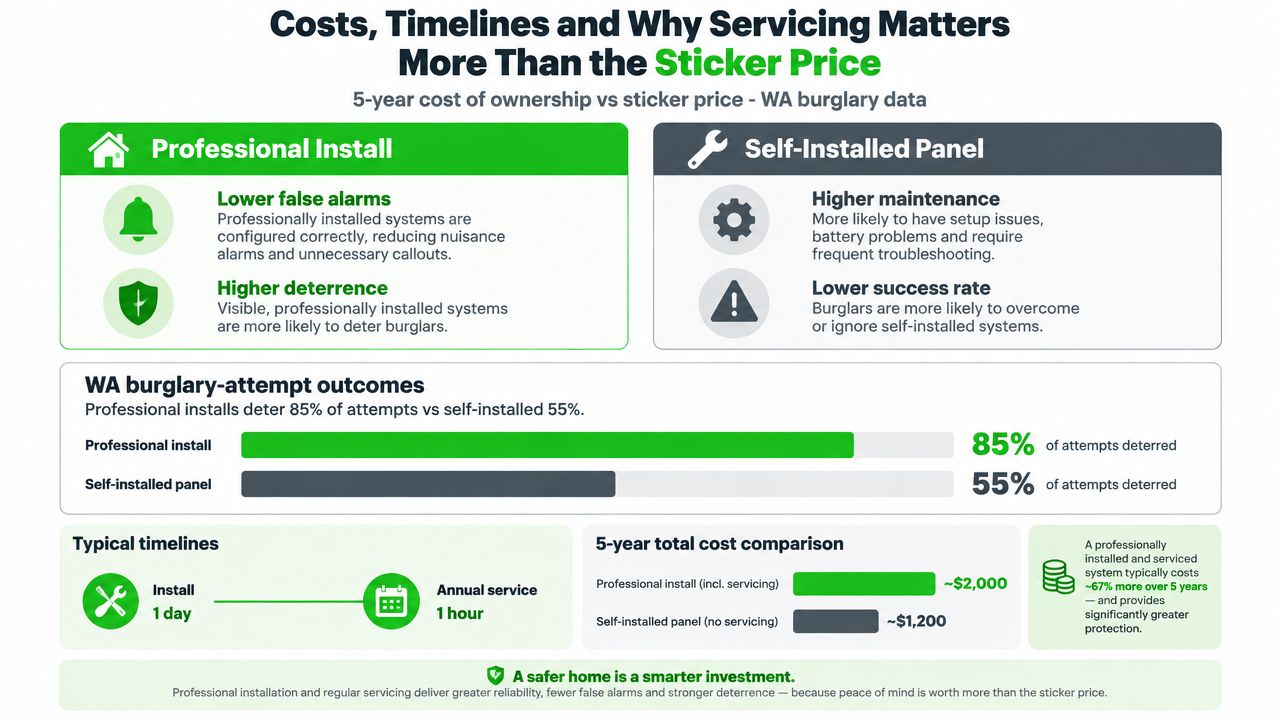
Plan the project around dependencies
A straightforward home installation can be completed promptly once the survey, equipment and site access are confirmed. Delays often follow coordination for NBN-based reporting, uncertainty over external siren placement or equipment availability. Property manager and strata approvals can also affect the schedule.
The Australian security-system installation and monitoring industry is estimated at about $2.5 billion in 2026, with 1,763 businesses, according to IBISWorld's industry profile. Buyers should therefore assess more than the siren. Serviceability, remote visibility and future support for cameras or access control may have greater value over the system's working life.
For customer-facing businesses, review management pricing can help organise feedback workflows, but it does not replace alarm maintenance. Put service terms in the security quote and compare the complete five-year ownership cost, not only the smallest starting figure.
Hiring the Right Perth Installer and Keeping the System Healthy
Take the same written scope to several installers. If one quote includes a panel, keypad, siren and vague “sensors”, while another identifies every zone, cable route and commissioning task, they aren't like-for-like offers.
Use this installer checklist
- Licence and insurance: Ask for the WA Security Agent licence details, relevant monitoring accreditation and evidence of public liability cover.
- Itemised equipment: Require the exact panel model, detector types, communications path, siren specification and backup-power arrangement.
- Installation method: Confirm whether cables will be concealed, where conduit may appear and how roof-space or wall access will be handled.
- Monitoring responsibility: Ask who receives alarm events, how notifications are tested and what the response process requires.
- Warranty and service: Get hardware, workmanship and callout terms in writing, including what happens after the initial warranty period.
- Handover documents: Insist on the zone list, device map, programming sheet, as-built diagram, user instructions and compliance documentation.
The installer should explain what happens if the NBN, mains power or wireless communications fail. They should also show you how to isolate a nuisance zone without leaving the entire property unprotected.
Keep the system honest after handover
Run a walk-test of every detector periodically, check the siren and strobe, review wireless battery status and confirm that notifications still arrive. Schedule professional servicing to inspect backup batteries, tamper circuits, detector condition, firmware where applicable and the communications path.
Avoid changing user codes without recording the update, and remove old users when household or staff access changes. Keep the panel, keypad and detectors clear of obstructions, dust and redecorations that alter coverage. For businesses, tie alarm maintenance to the same facilities calendar used for CCTV, access control and emergency systems.
A security company may also use an AI phone agent for alarm firms to manage routine enquiries, but the person commissioning your system should still explain the physical installation and demonstrate every agreed function.
Run this commissioning script on day one
- Arm the system from the normal entry keypad.
- Open each protected door and confirm the correct zone name.
- Walk through each PIR coverage area.
- Trigger the external siren, internal sounder and strobe during the agreed test.
- Disarm using the authorised code and confirm the event history.
- Test app or monitoring notifications if included.
- Simulate a mains failure and check the reported fault condition.
- Sign the handover only after the zone list and user instructions match the installed system.
The goal isn't to install a burglar alarm. It's to leave with a documented, testable system that still makes sense when the property changes, a battery fails or an event occurs at an inconvenient hour.
For a site-specific design, Securitec Security can assess your Perth property, compare wired, wireless and hybrid options, and install or maintain alarms alongside CCTV, intercom and access control. Visit Securitec Security to request a consultation and quote based on your entry points, building construction and monitoring needs.